

Step-by-Step
Instructions

Always wipe the wrap with a disinfectant wipe before use
Setup & Connection
Fill the Unit
Remove the machine from its carry bag. Unscrew the NICE-symboled top and pour 250–350 ml of water into the hole. Use water only — never any other liquid.

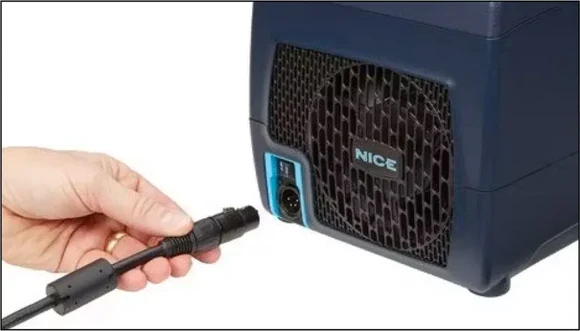
Connect Power
Plug the power supply cable into a power outlet. Insert the circular end into the NICE machine — you will hear a click when inserted correctly.
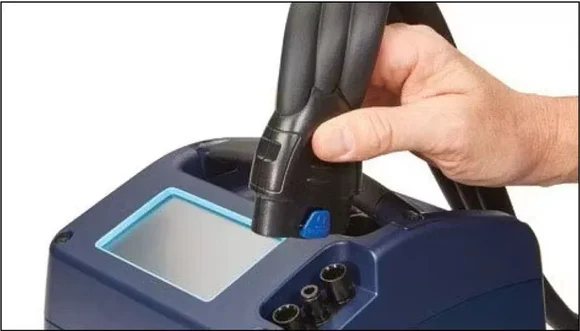
Connect Hose to Unit
Attach the hose to the control unit with the NICE symbol and blue button pointing outwards. You will hear a click when properly connected.
Fit the Wrap
a) Place the wrap on the appropriate body part and secure it with the hook-fastener strips.
b) Connect the hose to the wrap. You will hear a click when properly connected.

Switch On
Once the machine is filled with water, the wrap is fitted to the joint area, and the hose is connected, flip the on/off switch from OFF to ON.

Device Settings
Checklist Screen
Once powered on you are welcomed by the checklist screen. Confirm all steps are complete, then press NEXT on the touchscreen.
Cold Selection
Choose your temperature level — 1 is warmest (14.4°C), 5 is coldest (5.5°C). Levels 3 or 4 are recommended. Press NEXT (see below).
Compression Settings
Select your compression level: Low for the first 24–48 hrs, Medium or High afterwards. Then choose your compression type: Constant or Intermittent (pulsing). Press NEXT.
Time Settings
Choose a Manual session of 5–40 minutes, or select a Preset Program for multiple sessions. Press NEXT.
Confirm & Start
Review your settings on the summary screen, then press START to begin. Press BACK if you need to make changes.
During Your Session
Adjust cold (press 1–5) or compression (press HIGH / MED / LOW) at any time. Press Dim to dim the screen; touch the screen to brighten.
Maintenance
Drainage Device
Now it is time to drain the unit. Attach the DRAIN connector to end of hose. Turn lid on top of NICE machine to open water tank which helps with drainage.

Drain Coolant
Press Drain Coolant. It will follow with another checklist. Press next. On the following screen press drain and the unit will empty the water tank.

General maintenance
A Residual amount of water will be left in water tank. Using kitchen roll or equivalent soak up remaining water. You can wipe the inside of the water tank with disinfectant wipes. Once draining has completed, detach plug and hose from unit. Ensure all parts are inserted into Myrecoverease provided carry bag.
Wrap Placement Guide

Leg / Knee
Hip

Shoulder

Foot / Ankle
In Use
Quick-Reference Settings
Temperature Guide
| Level | Degrees C | Note |
|---|---|---|
| 1 | 14.4 | Warmest |
| 2 | 12.4 | — |
| 3 ✓ | 10 | Recommended |
| 4 ✓ | 7.7 | Recommended |
| 5 | 5.5 | Coldest |
Compression Guide
Low
First 24–48 hours post-injury or surgery.
Medium
General recovery after the initial phase.
High
Active recovery once comfortable.
Recovery Tips
Use for up to 4 sessions a day of 20–40 minutes each, with a minimum 2-hour break between sessions.
Optimal temperature is 8–15°C. Below 12°C, use a barrier (tubigrip, leggings, etc.) between the wrap and your skin.
After 72 hr of daily use, drain the water using the Drain Coolant setting on the home screen with the water drainage device.
Always turn the machine OFF before disconnecting the hose or removing the wrap.